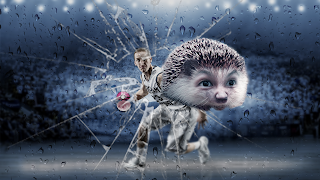
At first I thought of tall buildings, but I can't decide which building.
Then, I thought of Yao Ming, China basketball player. (Ya, I wanted to be tall. Hmph.)
And our lecturer suggest us to swap face with animals instead, to test our skill.
I choose hedgehog. And recently I always see Pokemon posts, so I wanted to add it in too.
http://i.stack.imgur.com/ClbRc.png
https://i.ytimg.com/vi/-FDe3bwfCkU/maxresdefault.jpg
As for my selfie... I tried my best to look fierce, as I wanted to make the cute hedgehog look fierce after that. Just try to imagine yourself have a wide open mouth, raising the eyebrows and staring fiercely.
And...
It turns out to be funny instead. /.\
I played around with opacity to blend in with the colours, layer masking to get the correct position.
To make it looks more natural, when I mask, I set the brush to be more feathery, which can be done in brush preset. It is in right hand side panel, If can't find it, search Window from the top bar, display the brush preset then.
The bottom left of the background actually got a box. To fix that, I used stamp tool and crop & copy the other corner, reflects it and adjust it. Then I use brush mixer for better blending. As usual, I'm lazy, so instead of mask out the basket ball, I picked color replacement tool to blend the basketball to the background and cover the trace with POKEBALL. And yes, its the mighty layer masking tool to make it happen again. And I used pen tool to select the cracking area, to mask the outer part, then top bar Filter>Blur>Gaussian Blur to make the 'windows' feel.
And this is the final. :D
Of course I did some adjustment by using brightness, contrast, hue and saturation, color balance, curves to blend everything.
After I posted it on Facebook, my senior gave me advice that I should add the motion blur on the hedgehog, and I try to enhanced it with smudge tool, and this is it. Weeeeeeeee.
This is my Photoshop first real try, using other tools beside adjustment area, and mash up the layers.
It took me 3.5 hours(before adding motion blur), but I'm still proud of it. It comes out better than my expectations. :D
P/s: Always remember your best buddies: Ctrl+alt+z for undo, history list, and Ctrl+D for deselect.


No comments:
Post a Comment