9.1.16

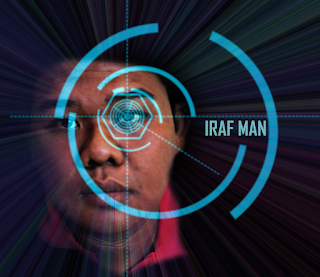
The making of Iraf man


Reference: http://abduzeedo.com/ironman-view-interface-effect-photoshop

I actually repeated everything in the tutorial, in a lazy way. :P
For the Illustrator part, its actually easier if we just save the file in psd, then move the layer in.
But if you follow the tutorial, you can use the blending option like what he did.

And in blending option, I used linear light for the effects, so that it is glowing.

Good luck on following the tutorial. :)

P/s: Thank you RAF to be my model. ;)

5.1.16

Displacement Maps to on T-Shirt design


https://www.youtube.com/watch?v=fzEqkiRZhgU

I followed the tutorial.

These are the references:

https://www.google.com/search?q=red+shirt&espv=2&biw=606&bih=581&source=lnms&tbm=isch&sa=X&ved=0ahUKEwjuy4_385fKAhXRGo4KHZYfAUEQ_AUIBygC


https://s-media-cache-ak0.pinimg.com/736x/df/02/7b/df027bf16fc9e39310657106ebf3d820.jpg


Ctrl+T: select tool
Ctrl+D: deselect tool

Filter > Distort > Undefined Areas > Wrap Around:
Because I choose a photo that have a background, so I choose wrap around instead of  repeat edge pixels.

Layer > Blending Option:
Over the scale, you can adjust settings by moving the arrow, and you can make it more detail by Alt+Click the arrow to split it to two.

3.1.16

Text Manipulation


How I did the Text Manipulation
1.       Create a new document
2.       Type “#2015Lastminutism”, and adjust the place I want it to be.
4.       Adjust the photo and change the opacity.
5.       Press Alt+Ctrl+G to create clipping mask.
6.       Save file, DONE.

Extra:
Ctrl+Alt+Z : UNDO
Ctrl+T: Select

(These two are very useful.)

25.12.15

Sharing session


This is PHLearn, a nice to learn YouTube channel.
I learn almost everything from this site. The rest I learn it from my sister and friends.

Guys, please have a good learning time. :)

20.12.15

Face Make Over


Uhm, ya, my photo. Actually I dislike to post photo of myself, but yup, my exercise for Computer Graphic class.

Enhance my face, I used spot remover, adjustment list at the right panel, brightness, contrast, curves.

And I tried to trim my fly out hair by using pen tool to mask them out. and to make it looks smoother I change my brush preset and use smudge tool on it.

I used the color replacement tool to make my hair looks dark green, but it isn't that visible, as to make it more natural, I put down the opacity.

Eye shadow, by using color replacement tool and opacity.

Brighten eyes and teeth, use laso tool to select and mask the part. But I didn't add too much effect to make it stay realistic.

And again, PHLearn helps a lot, thanks PHLearn.

Make low resolution photos high resolution in Photoshop


This is what I tried out according to the link that our lecturer share to us: https://www.youtube.com/watch?v=pc0PpS9nWV0

Good luck guys, have a good try, by the way, I also used this on my assignment, the pokeball hedgehog photoshop, for some certain resources.

19.12.15

Enhanced Photo - Model: Thiyagu

I used a raw file for this, and I realise that older version of Photoshop actually can't open raw file, need to get Photoshop CC for edit.

For this photo I tried out something new for me: Spot remover, Thank you Thi for teaching me this.
But I didn't use that a lot, as it might be too 'plastic' and not realistic. (Alright I know I actually over edit this too, newbie, part of learning.)

Besides that, I play around with Adjustment list at the right hand side panel.
Especially Brightness and Contrast. I like the contrast tool, as it makes the colour pops out which help the photo looks more 'solid'. (And yeah, I'm a lazy bum, contrast reduce a lot of works. :P)

Color balance, hue and saturation, etc etc in the adjustment list are easy to play around with. You can just keeps on trying until you get a photo you like. If you are not satisfied with your work, always remember Ctrl+alt+z, best buddy ever. :P Or there's a lot of previous work that you need to undo, try to search through history lists. It's at the right panel list. If you can't find it, don't panic, go to the top list, search for Window, and find for history, you can choose which tool to display there.

That's it for now.